Dave is a marketing expert with 15 years experience in the tech and SaaS world. He specializes in educating IT and channel audiences, with a focus on security, privacy, compliance, and marketing technology. With a talent for storytelling and a deep understanding of the industry, Dave transforms complex IT topics into clear, engaging, and impactful narratives.
The ultimate guide to automatically removing older emails from Exchange and Outlook
TL;DR
Cleaning out old emails manually takes time, especially when inboxes fill up with hundreds of messages each week.
Automating the removal of older emails in Outlook or Exchange helps keep your inbox organized and easier to navigate.
AutoArchive in Outlook and retention policies in Exchange can remove outdated messages on a schedule you choose.
A cleaner inbox improves performance, reduces security risks, and helps you focus on recent, relevant communication.
Tools like rules, folders, and automated sorting make long-term email management simpler for busy users and IT teams.
If your organization uses Microsoft 365, you can also centralize and automate your email signatures with Exclaimer.
Clearing out old email doesn't need to be a chore. Whether you're running a business, working in IT, or just trying to keep your personal inbox under control, automating the removal of older messages helps you stay organized and focus on what actually matters.
This guide walks you through the ways to automatically remove older emails in Exchange and Outlook, using tools you already have, from a single mailbox up to your entire organization.
If your organization runs on Microsoft 365, there's another area where automation pays off. Exclaimer's email signature manager gives you one place to manage every employee's email signature, saving IT time and keeping branding and legal content consistent across the business.
Why automate the removal of older emails?
Email management takes more time than most people want to admit. With inboxes filling up fast, it's easy for important messages to get buried. Plenty of old emails don't need to stay, yet they sit there anyway, adding noise and slowing you down.
Automation gives you a way to keep your inbox tidy without constant manual effort. It helps you stay focused, cuts down on clutter, and keeps storage under control.
Here are the key reasons to automate email cleanup:
Save time: Manually sorting and deleting old messages can feel endless. Automation takes that work off your plate so you can focus on what actually needs attention.
Stay organized: A crowded inbox makes it harder to spot the messages that matter. Removing older emails keeps things clean and easier to navigate.
Improve performance: Large mailboxes can slow down your email client. Regular cleanup helps your inbox run smoothly.
Protect privacy: Old messages often contain sensitive information. Automatic removal reduces the chance of outdated data lingering longer than it should.
Four tools, four scopes: which one do you need?
Outlook and Microsoft 365 give you four built-in tools for this, and they're not interchangeable.
Tool | Scope | Where it lives | Reversible? | Moves items to archive? |
|---|---|---|---|---|
AutoArchive | One folder, one mailbox at a time | Classic Outlook for Windows only (not in new Outlook) | Yes, from the archive it creates | Yes, that's its main use |
Exchange Online Auto-Archiving | Whole mailbox, triggered automatically | Server-side, enabled by default; no Outlook client involved | Not applicable: it archives rather than deletes | Yes, automatically once a mailbox nears its quota |
Exchange retention policy (MRM) | One mailbox at a time, or several selected together | Tags/policies: Microsoft Purview portal. Applying to a mailbox: Exchange admin center | Depends on the tag's action: "Delete and allow recovery" is recoverable within its own window; "Permanently delete" isn't | Yes, with a "move to archive" tag |
Microsoft 365 retention policy | Every mailbox in the organization, by default | Microsoft Purview portal | Not recoverable by the end user once deleted, though items may still surface via eDiscovery while the retention period is still running | No |
Key takeaway
Recoverability isn't uniform across tools, and it isn't even uniform within one tool. AutoArchive and an Exchange tag set to "delete and allow recovery" both give you a real recovery window. A tag set to "permanently delete," and a Microsoft 365 retention policy's deletion, generally don't.
If you're on classic Outlook and managing your own mailbox, AutoArchive is usually enough. If you're on new Outlook, or want mailbox-quota protection regardless of client, Exchange Online's own Auto-Archiving already has you covered by default.
If you're managing retention for the whole organization, a Microsoft 365 retention policy is the current Microsoft-recommended route. If you specifically need items moved into an archive mailbox on your own terms rather than deleted, that's what an Exchange retention policy (MRM) is for.
Using Outlook's AutoArchive feature
AutoArchive lets you apply a policy that clears older emails from specific folders, but it's only available in classic Outlook for Windows. If your organization has moved to new Outlook, including through an Intune-managed rollout, this feature isn't there for you. Skip to the next section for the server-side alternative Microsoft built to cover that gap.
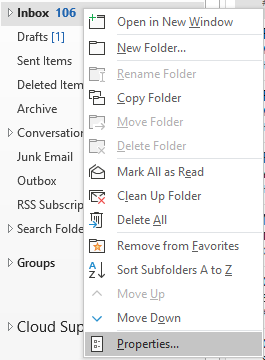
In Outlook, right-click on the folder and select Properties. For example purposes, the below screenshot displays the Inbox folder selected.
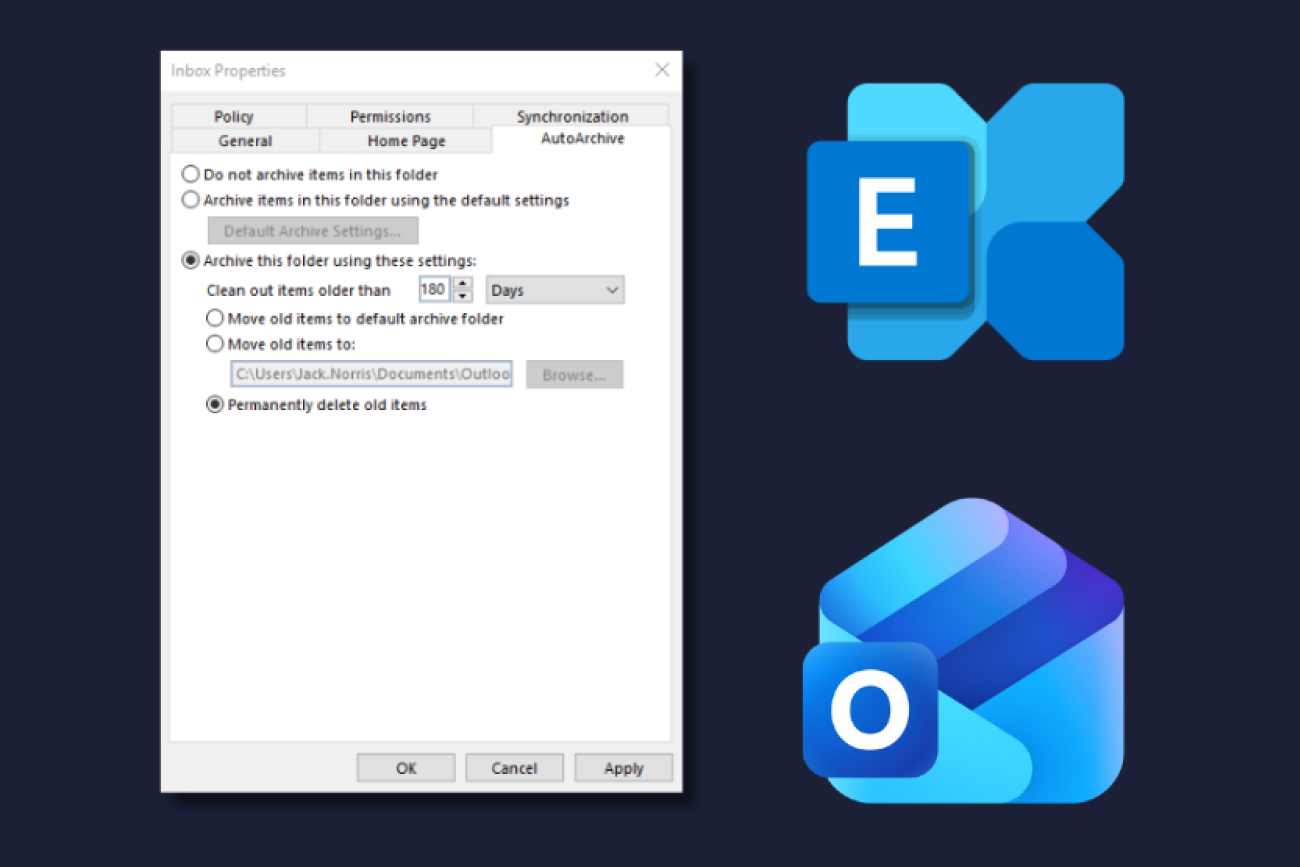
Select the AutoArchive tab and select Archive this folder using this settings.
In Clean out items older than, enter 180 days, or whatever the desired amount of days/months/years may be:
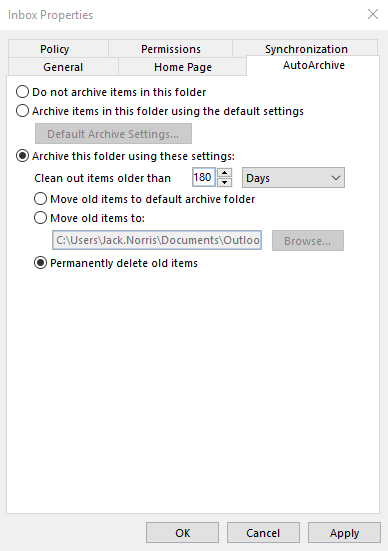
Select the Permanently delete old items option.
Click OK to save the changes and close the window.
Repeat the process for any other folders you want to set an auto-archiving policy for.
Exchange Online's Auto-Archiving feature (works in any Outlook client)
Because AutoArchive doesn't exist in new Outlook, Microsoft built a server-side replacement directly into Exchange Online called Auto-Archiving, a specific feature name distinct from both the client-side AutoArchive above and from Auto-expanding Archive. It's enabled by default and needs no setup to start working:
When a mailbox's usage crosses 96% of its quota (an organization can adjust this anywhere from 80% to 100%), Exchange automatically moves that mailbox's oldest items into the user's archive mailbox, until usage drops back below the threshold.
It only touches items received more than 60 days ago, and it skips anything tagged "Never Move to Archive."
It doesn't delete anything and doesn't change your retention policies. Its only job is stopping a full mailbox from blocking mail flow.
The catch is that it needs an archive mailbox already provisioned for the user (Auto-Archiving doesn't create one) and can't move anything if that archive is also full with auto-expanding archive turned off. Licensing is the same as for any other archive mailbox: Exchange Online Plan 2, or the Exchange Online Archiving add-on for Plan 1.
Tip
If your organization has moved everyone to new Outlook, this is your real substitute for AutoArchive rather than a retention policy. Retention policies solve time-based cleanup on a schedule you set; Auto-Archiving solves the "mailbox is about to hit its wall" problem automatically, regardless of age.
Applying an Exchange retention policy to a mailbox
Exchange retention policies (technically, messaging records management, or MRM) let you automate email cleanup on a mailbox-by-mailbox basis.
This is the route to use if you need to move items into an archive mailbox on your own schedule rather than only as a quota failsafe, since Microsoft's own guidance is clear that Microsoft 365 retention policies can't move items to archive at all. In fact, it recommends Microsoft 365 retention policies for proactive retention and deletion generally, but says to keep using MRM specifically for archive-mailbox moves.
To apply an existing retention policy to a mailbox, via the Exchange admin center:
Sign in to the Exchange admin center and go to Recipients, then Mailboxes.
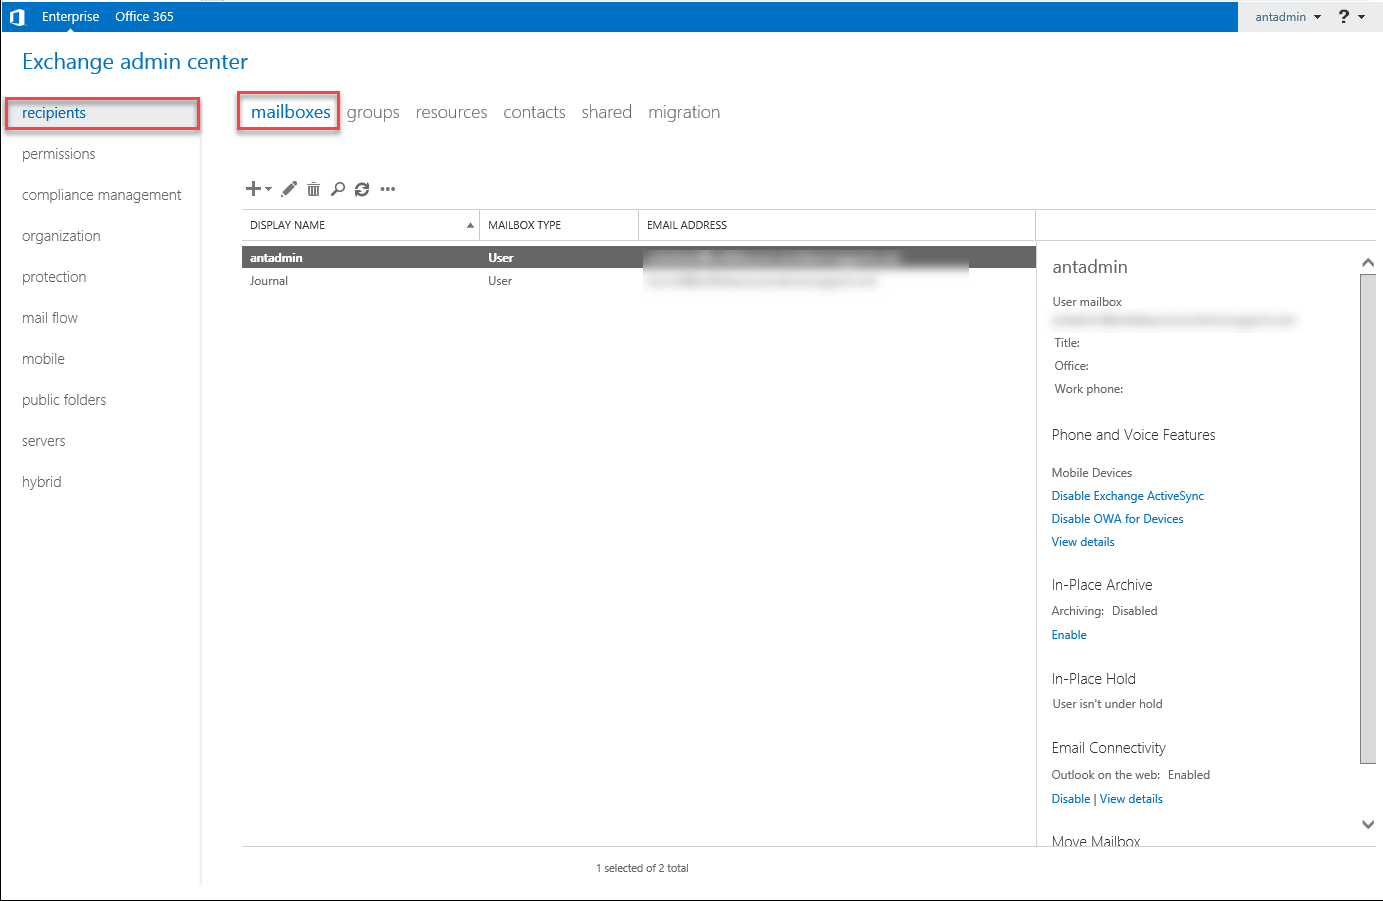
Select the mailbox you want to add the retention policy to:
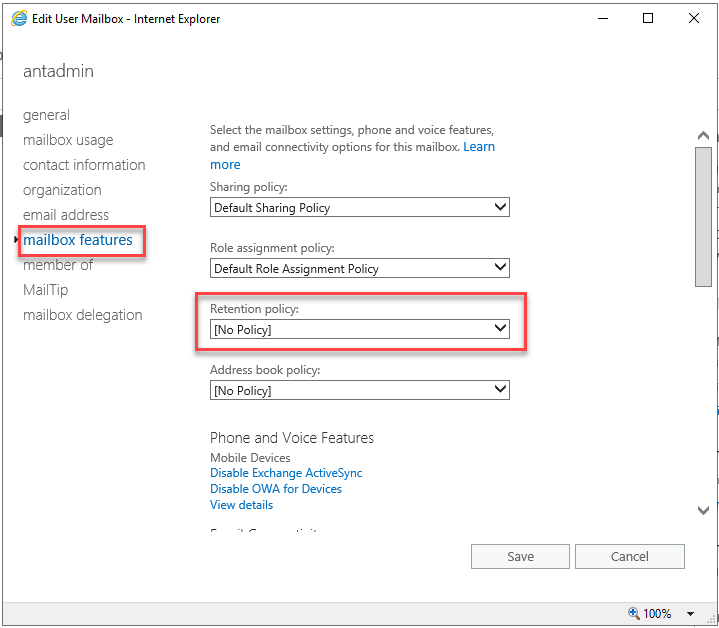
In the mailbox's details pane, select Mailbox, then under Retention policy, select Manage mailbox policies.
Use the Retention policy drop-down to select the policy you want, then select Save.
You'll need to apply a policy to each mailbox that should follow automated cleanup rules, or select multiple mailboxes at once from the list view. If you're setting deletion rules for every mailbox in the organization, the Microsoft 365 retention policy below is faster.
Creating or editing an Exchange retention policy
The retention tags and policies you apply above are no longer created in the classic Exchange admin center.
Sign in to the Microsoft Purview portal and go to Solutions, then Data lifecycle management, then Exchange (legacy), then MRM Retention tags.
Select New tag, choose how it applies (to the entire mailbox, a default folder like Inbox, or as a personal tag users can apply themselves), and set the retention period and action. This is the choice that decides recoverability: "Delete and allow recovery" keeps items recoverable for the mailbox's normal deleted-item retention period; "Permanently delete" doesn't; "Move item to archive" doesn't delete anything at all.
Once your tags exist, go to MRM Retention policies in the same area, select New policy, name it, and add the tags you want grouped together.
Apply the finished policy to mailboxes using the steps in the section above.
Setting a Microsoft 365 retention policy for all mailboxes at once
Governance problems rarely stay simple once you're doing something one instance at a time instead of once, for everyone. Paul Hammond, Exclaimer's Chief Product and Technology Officer, has described this pattern in the context of managing governance across multiple software tools:
"If you've got one tool, you've got one governance problem. If you've got two tools, you've got two. But once you've got three tools talking to each other, that's seven or eight connections between them. That's the matrix multiplication problem. You're only as good as the weakest governance in the mix. It doesn't matter how good ours is if you're integrating with another tool that's less rigorous. Your system's governance is only as good as your weakest integration."
Microsoft's current guidance points admins toward Microsoft 365 retention policies, managed in the Microsoft Purview portal, rather than the Exchange/MRM route above, for exactly this "handle it once, for everyone" scenario.
A Microsoft 365 retention policy applies to every mailbox by default, including new mailboxes created after the policy goes live, so you're not repeating the setup as your organization grows. Once submitted, it can take up to seven days for a new retention policy to fully distribute and take effect, so build that lag into any compliance deadline you're working against.
Tip
If you're working against a compliance deadline, submit the retention policy at least a week ahead of time to account for the up-to-seven-day distribution window.
Sign in to the Microsoft Purview portal with an account that has retention permissions.
Go to Solutions, then Data Lifecycle Management, then Policies, then Retention policies.
Select New retention policy, name it, and choose Exchange mailboxes as a location.
Leave the location scoped to all mailboxes, the default, so the policy covers every current and future mailbox automatically. You can choose specific inclusions or exclusions if needed.
Decide whether to retain content, delete it, or retain and then delete it, and set the timeframe.
Review and save the policy.
This is a tenant-wide setting, so a compliance or Microsoft 365 admin typically owns it rather than an individual mailbox owner.
A note on shared mailboxes
Shared mailboxes generally get covered without any extra setup. If your organization has a Microsoft 365 retention policy scoped to all Exchange mailboxes, shared mailboxes are automatically included, and no additional license is required for that basic coverage.
Tip
Microsoft 365 retention policies can't move a shared mailbox's items into an archive, the same as for any other mailbox. If you need a shared mailbox archived rather than deleted, you'll need an Exchange retention policy (MRM) for that mailbox and an Exchange Online Plan 2 license assigned to it.
Additional tips for Exchange and Outlook email management
Use folders and subfolders: A simple folder structure makes it easier to group related messages and find what you need. Subfolders help you keep specific projects or conversations in one place.
Review your inbox periodically: Even with automation in place, a quick review every month or so helps you catch anything that no longer needs to be stored.
Use filters and rules: Outlook and Exchange can sort incoming mail automatically. Rules keep priority messages visible and reduce noise across your inbox.
Centralize email signatures: If your organization uses Outlook or Exchange, signature management is another task worth automating. Exclaimer's platform keeps every signature consistent by updating contact details, disclaimers, and banners across all users from one platform. It saves IT time and keeps branding accurate.
Pick the tool that matches your scope
Automating the removal of older emails in Outlook and Exchange keeps your inbox organized and reduces the day-to-day effort of managing mail. Which tool does the job comes down to your Outlook client and your scope: AutoArchive or Exchange Online's own Auto-Archiving cover a single mailbox; a Microsoft 365 retention policy through Purview covers the whole organization at once.
With the right tool in place for the scope you actually need, your system stays cleaner and easier to navigate. It also supports better information management across your organization.