Dave is a marketing expert with 15 years experience in the tech and SaaS world. He specializes in educating IT and channel audiences, with a focus on security, privacy, compliance, and marketing technology. With a talent for storytelling and a deep understanding of the industry, Dave transforms complex IT topics into clear, engaging, and impactful narratives.
How to set up DKIM in Microsoft 365 (without breaking your email signatures)
TL;DR
DKIM (DomainKeys Identified Mail) adds a cryptographic signature to your outbound email, so receiving servers can confirm the message came from your domain and wasn't altered in transit.
In Microsoft 365 (still commonly called Office 365), you enable DKIM per domain from the Microsoft Defender portal or with Exchange Online PowerShell, then publish two CNAME records in your DNS.
Use a 2048-bit key and rotate it at least once a year. The PowerShell default is a weaker 1024-bit key, so specify the stronger size yourself.
Adding an email signature after Microsoft 365 has already signed a message breaks DKIM. Sign after the signature is inserted, not before, and confirm it with
dkim=passin the Authentication-Results header.
If you're setting up email authentication for your domain, DKIM is the piece most likely to cause friction later, especially if you also manage email signatures across the business. Fewer than one-third of organizations have implemented DMARC, DKIM, or SPF, according to Exclaimer's State of Business Email 2025, so configuring it at all puts you ahead of most senders.
This guide walks through what DKIM is, how to enable it in Microsoft 365 using the Defender portal or PowerShell, how to rotate your keys, and how to test that it's working. It also answers the question most IT teams have when adding a signature tool: whether inserting an email signature breaks DKIM, and how to configure Microsoft 365 so it doesn't.
"Email has something most channels don't: authentication standards. DMARC, DKIM, SPF. Imperfect, but they exist. ... But that trust depends on organizations actually implementing these standards properly. The gap between companies with enforced DMARC and those without will widen. The latter become prime targets for impersonation."

What is DKIM and how does it work?
DKIM, or DomainKeys Identified Mail, is an email authentication method that attaches a digital signature to every message you send. It lets the receiving server confirm the message came from your domain and wasn't altered in transit. It works with a pair of cryptographic keys: a private key that stays with your mail server, and a public key you publish in DNS. Your server signs outbound messages with the private key, and receiving servers use the public key to verify the signature.
DKIM doesn't encrypt anything or hide the message content. It signs the message so the recipient can trust two things: your domain authorized it, and the parts covered by the signature haven't changed since signing. That second guarantee is exactly why email signatures and DKIM can collide, which we get into below.
The DKIM signing and verification process
When your mail server sends a message, it hashes selected headers and the message body, signs that hash with your private key, and adds the result as a DKIM-Signature header. The receiving server looks up your public key in DNS, uses it to verify the signature, and recomputes the hash from the message it actually received. If the two hashes match, DKIM passes. Matching hashes mean DKIM passes. If anything covered by the signature changed after signing, the hashes won't match and DKIM fails.
DKIM validates the message exactly as it existed the moment of signing. Change the signed content afterward, and validation breaks.
DKIM vs. SPF vs. DMARC
DKIM is one of three authentication standards that work together, each doing a different job.
Standard | What it does | Where it's configured |
SPF | Tells receiving servers which servers are allowed to send mail for your domain | Your SPF record |
DKIM | Proves the message content is authentic and unaltered since signing | Microsoft Defender portal or PowerShell |
DMARC | Ties SPF and DKIM together: tells receivers what to do when a message fails either check, and reports back on what's happening | A DMARC policy record in your domain's DNS |
How to enable DKIM in Microsoft 365
You can turn on DKIM signing for a custom domain two ways: through the Microsoft Defender portal, or with Exchange Online PowerShell. Both do the same job. They generate a key pair, give you two CNAME records to publish, and switch signing on once those records resolve. Your initial onmicrosoft.com domain is already DKIM-signed by default, so these steps apply to the custom domains you actually send from.
Before you start, add the domain to Microsoft 365 if you haven't already, and confirm you can edit records at your DNS host, where your MX record and other mail settings already live.
Enable DKIM in the Microsoft Defender portal
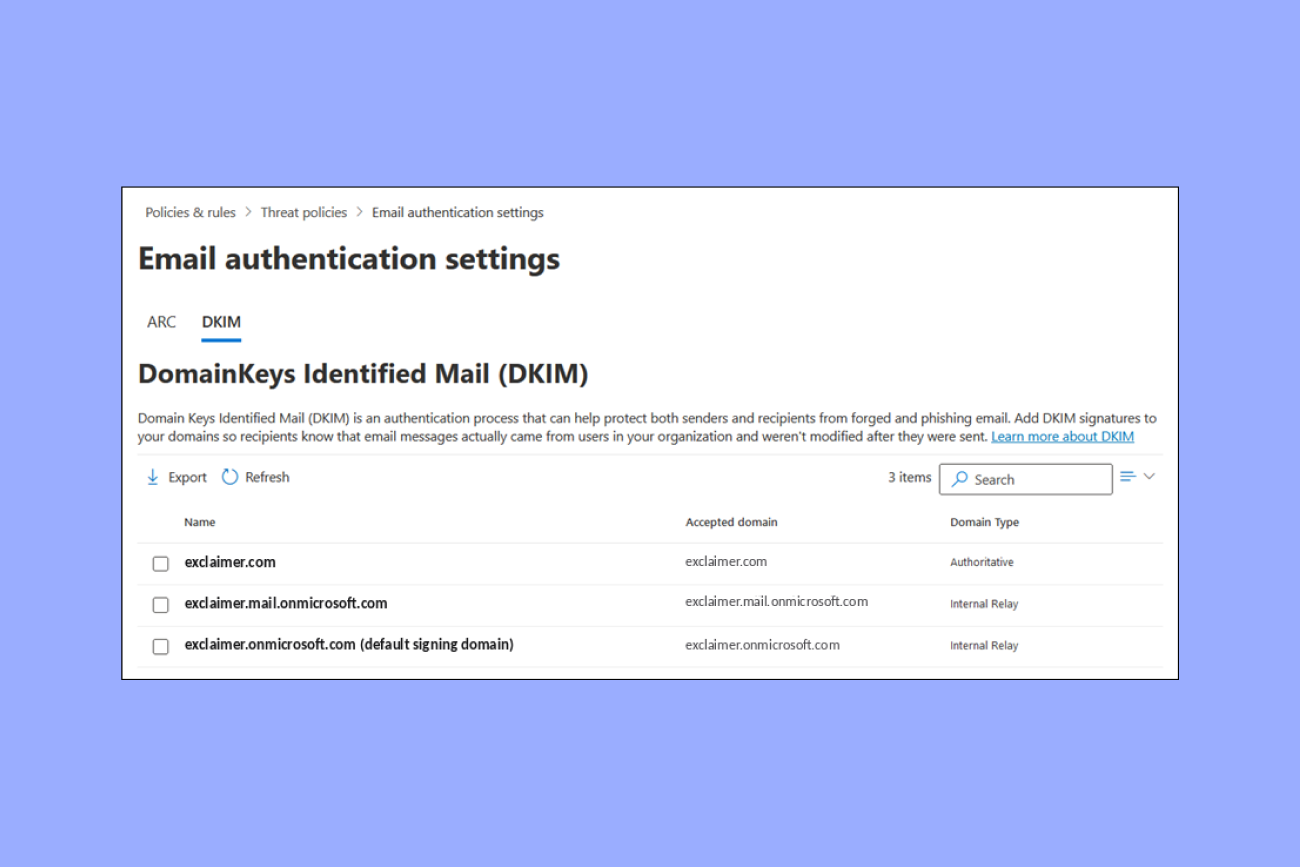
Go to the Defender portal at security.microsoft.com and open Email & collaboration > Policies & rules > Threat policies > Email authentication settings. You can jump straight there with security.microsoft.com/authentication.
Select the DKIM tab, then click the domain you want to configure.
In the flyout, find the two CNAME records under Publish CNAMEs and copy both exactly.
Create those two CNAME records at your DNS host, then wait for them to resolve.
Return to the flyout and switch Sign messages for this domain with DKIM signatures to Enabled. Status changes to Valid once Microsoft detects the records.
Enable DKIM with PowerShell
If you'd rather script it, connect to Exchange Online PowerShell and check the current state first:
Connect-ExchangeOnlineGet-DkimSigningConfig | Format-List Name,Enabled,Status,Selector1CNAME,Selector2CNAMEIf your custom domain isn't listed, create a signing configuration in a disabled state. This generates the keys and selector values without signing anything yet:
New-DkimSigningConfig -DomainName contoso.com -Enabled $false -KeySize 2048Copy the Selector1CNAME and Selector2CNAME values from the output, publish them as CNAME records at your DNS host, and once they resolve, enable signing:
Set-DkimSigningConfig -Identity contoso.com -Enabled $trueRun Get-DkimSigningConfig again to confirm Enabled is True and Status is Valid. New-DkimSigningConfig defaults to a 1024-bit key, so add -KeySize 2048 if you want the stronger size from the start.
Publish the DKIM CNAME records in DNS
Microsoft 365 doesn't ask you to publish the public key directly. You publish two CNAME records that point to Microsoft's DKIM infrastructure, and Microsoft manages the underlying keys for you. That's why CNAMEs are used here rather than the raw TXT record some other platforms use. A TXT key by hand leaves the status stuck on CnameMissing.
For a new custom domain, the records follow this format, introduced in May 2025:
Hostname: selector1._domainkeyPoints to: selector1-contoso-com._domainkey.contoso.n-v1.dkim.mail.microsoftHostname: selector2._domainkeyPoints to: selector2-contoso-com._domainkey.contoso.n-v1.dkim.mail.microsoftDomains configured before that change use an older format ending in your onmicrosoft.com domain. Either way, don't build these values by hand because a single wrong dash or dot leaves signing broken. Publish both records even though only one selector is active at a time, since the inactive selector is what lets keys rotate later without downtime. Set the TTL to at least 3600 seconds to avoid intermittent lookup failures.
Does adding an email signature break DKIM?
It can, but with the right setup it won't. Inserting an email signature changes the message, and DKIM exists specifically to detect that kind of change. This is why signature tools and DKIM need to be configured to work together.
Most server-side signature tools add the email signature by routing outbound mail through a transport rule that inserts HTML into the message body. If that HTML is added after Microsoft 365 has already applied the DKIM signature, the body no longer matches what was signed, and DKIM fails at the receiving end. That's the failure mode IT teams are right to worry about before they roll a signature tool out company-wide.
The fix is the order of operations. Exclaimer's cloud solution strips the DKIM signature on receipt, inserts the email signature, and returns the message to Microsoft 365, which re-applies DKIM after the signature is in place and before delivery. Because the final signing happens after the content is added, the signature the recipient verifies matches the message they receive, and DKIM passes.
Getting the order wrong is easy to miss, because the email still looks correct to the sender while quietly failing authentication at the other end. You don't have to take a vendor's word for where signing happens: send a real test message with the signature already applied, and check for dkim=pass in the Authentication-Results header, the same way you'd validate DKIM on its own (see the testing section below). A Valid status in the Defender portal only confirms your DKIM configuration exists; it says nothing about whether a signature inserted later broke it.
How to rotate your DKIM keys in Microsoft 365
DKIM keys are credentials, and like any signing credential, they should be rotated on a schedule: at least once a year. Microsoft 365 doesn't rotate custom domain keys for you, so this is a task you own.
The two CNAME records you published earlier are what keep rotation from disrupting mail flow. One selector signs your mail while the other sits on standby. When you rotate, Microsoft 365 activates the standby selector with a fresh key and retires the old one, so signing never stops.
To rotate in the Defender portal, open the DKIM tab, select the domain, and choose Rotate DKIM keys at the bottom of the flyout.
To rotate with PowerShell:
Rotate-DkimSigningConfig -Identity contoso.comTo move up to a 2048-bit key at the same time, add the KeySize parameter:
Rotate-DkimSigningConfig -Identity contoso.com -KeySize 2048Rotation isn't instant. The new key takes four days (96 hours) to start signing, and the current key keeps signing until then. You can't start a second rotation while one is in progress. There's one gotcha when raising the bit depth: the 2048-bit size applies only to the next active selector on this rotation, so the other selector updates to 2048 on the following rotation.
How to test and validate your DKIM record
A Valid status in the portal confirms your configuration, not that receivers accept your signature. Check both: the configuration in Microsoft 365, then a real message.
Start in PowerShell. Get-DkimSigningConfig should return Enabled as True and Status as Valid for your domain:
Get-DkimSigningConfig -Identity contoso.com | Format-List Name,Enabled,Status,Selector1CNAME,Selector2CNAMEThen test an actual email. Send a message from the domain to an external mailbox you control, open it, and view the original source or headers. Look for dkim=pass in the Authentication-Results header. You'll also see a DKIM-Signature header whose d= value matches your domain and whose s= value shows which selector signed the message, for example s=selector1-contoso-com.
A DKIM validation tool does the same check without reading headers by hand. Send a message to the address the tool gives you, or enter your domain and selector, and it reports whether the signature verifies against your published key. Either way, a passing result means the receiving side can validate your signature against DNS.
Common DKIM problems and how to fix them
Most DKIM problems in Microsoft 365 trace back to DNS or timing rather than DKIM itself. The failures below are the ones you're most likely to hit, with the fix for each.
Problem | What's happening | How to fix |
|---|---|---|
Status stuck on CnameMissing right after publishing | DNS changes haven't propagated yet | Wait for the records to resolve, which can take minutes to hours, then re-check. Confirm both CNAMEs resolve before troubleshooting further. |
Status stays CnameMissing after propagation | A mistyped selector target: dots kept instead of dashes, wrong onmicrosoft.com prefix, or a missing dynamic partition character | Copy the exact values from the Defender portal or Get-DkimSigningConfig. Don't build the target by hand. |
A TXT record was published instead of a CNAME | Microsoft 365 needs CNAMEs that delegate key management to Microsoft, so a raw TXT public key isn't supported | Delete the TXT record and publish the two CNAME records. |
Intermittent dkim=temperror or dkim=fail | The TTL on the CNAME records is set too low, causing DNS lookups to time out | Raise the TTL on both records to at least 3600 seconds. |
dkim=fail with a body hash mismatch | The message body changed after DKIM signing, often a signature or disclaimer added later in the mail flow | Route mail so signing happens after the content is inserted. |
Rotation appears to do nothing, or won't start again | Rotation takes 96 hours, and a second rotation is blocked while one is in progress | Wait for the current rotation to finish before starting another. |
If a message still fails once you've ruled out these causes, read the full Authentication-Results header. It shows whether the failure is DKIM, SPF, or DMARC, so you can isolate the problem instead of guessing.
Done right, you don't have to choose between authenticated mail and consistent, branded email signatures.